

Adding a “Next” and “Previous” button to your product pages can be a great way to keep customers engaged with your products. This video shows you how to add these buttons using the Dawn Theme for Shopify. Adding a Next Previous button to the product page of your Shopify store is a great way to make it easier for customers to browse through your products. I will show you how to add this button using the Dawn theme in this video.
Add this code in main-product.liquid file:
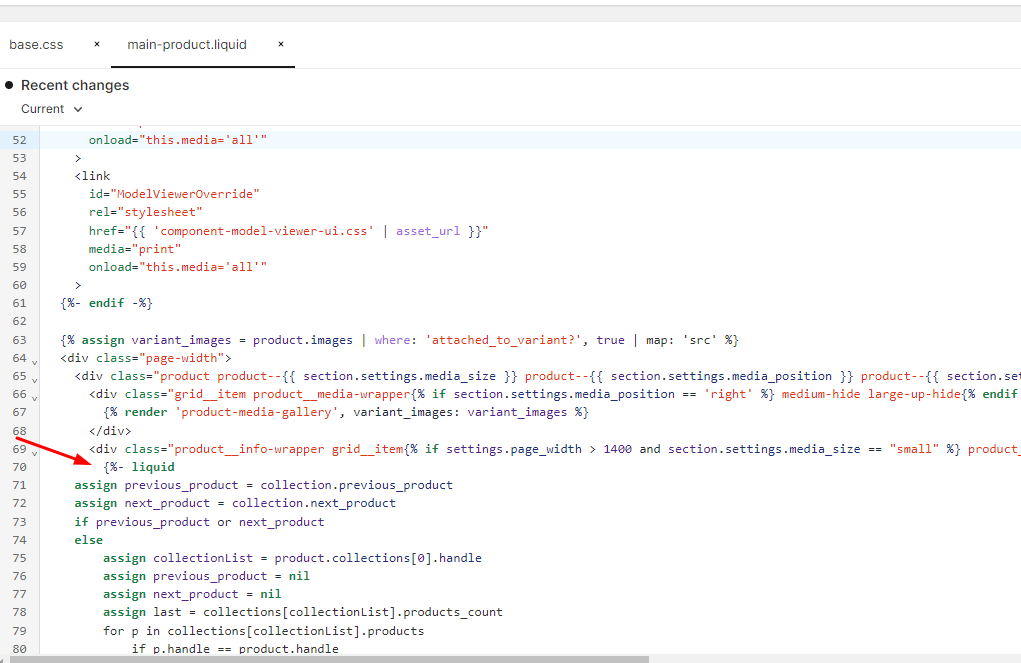
{%- liquid
    assign previous_product = collection.previous_product
    assign next_product = collection.next_product
    if previous_product or next_product
    else
    	assign collectionList = product.collections[0].handle
        assign previous_product = nil
        assign next_product = nil
        assign last = collections[collectionList].products_count
        for p in collections[collectionList].products
        	if p.handle == product.handle
            	assign prev = forloop.index | minus: 2
                assign next = forloop.index
                if prev >= 0
                  assign previous_product = collections[collectionList].products[prev].handle
                endif
                if last >= next
                  assign next_product = collections[collectionList].products[next].handle
                endif
                break
            endif
        endfor
    endif
-%}

<div id="nextpre">
    		{%- if previous_product -%}
            <a class="next-prev-icon prev-icon" href="{{ previous_product }}">
               Previous
            </a>
        {%- endif -%}
        {%- if next_product -%}
            <a class="next-prev-icon next-icon" href="{{ next_product }}">
               Next
            </a>
        {%- endif -%}
    </div>
Add CSS in the base.css file :
#nextpre{
    display: flex;
    justify-content: flex-end;
    margin-right: 6%;
}
.next-prev-icon{
        margin: 0 0 20px 20px;
    padding: 5px 10px;
    font-weight: 500;
    color: #fff;
    box-shadow: #0003 0 20px 30px;
    background-color: #000;
    border-radius: 10px;
    text-decoration: unset;
    width: 100px;
    text-align: center;
    font-size: 15px;
}


14 thoughts on “Add Next Previous Button On Product Page – Dawn Theme”
For some reason the previous icon does not appear right. We have the, < on the top line and "previous" is on the line below it. How can I fix it?
Replace CSS with following:
.next-prev-icon {
margin: 0 0 16px 23px;
padding: 5px 5px;
font-weight: 500;
color: #fff;
box-shadow: #0003 0 20px 30px;
background-color: #000;
border-radius: 10px;
text-decoration: unset;
width: 100px;
text-align: center;
font-size: 15px;
}
Thank you so much works beautiful. Can’t thank you enough.
Hello, is there a way to soften the loading of the product image when moving through products using the previous / next buttons? The products are popping in rather abruptly. Thank you.
You can add entrance animation using CSS
I really appreciate this!!! One question: Is there any way to put these buttons to the left and to the right? Like the previous button to the left and the next button to the right side? Again thanks!!
Yes can be done easily via CSS
the latest down theme the code are not working
Code is working fine
This code is so great – thank you! I’m seeing that about 1/2 way through our catalog, it thinks the catalog is over. The previous button disappears and then both buttons disappear in the next product and all following products. Any thoughts? Thank YOU!
Thanks for pointing out, will try to fix the code soon.
Hey man, am I asking bad questions? You keep deleting them? Dont’ mean to offend you, just wondering if you had any idea why the code was not working for me?
Hi Ryan, not deleting your comment. They were in moderation, didn’t get enough time to reply those. Really sorry
This doesn’t work if products are in more than one collection? Mine skips to random products.
Thanks!