

Updated Video
selector.elementor-sticky--effects{
background-color: rgba(0,0,0,0.5)!important
}
selector{
transition: background-color 1s ease !important;
}
selector.elementor-sticky--effects >.elementor-container{
min-height: 70px;
}
selector > .elementor-container{
transition: min-height 1s ease !important;
}
.logo img {
max-width: 140px;
height: auto;
transition: all 1s ease;
}
.elementor-sticky--effects .logo img {
max-width: 120px;
height: auto;
}
Video Tutorial:
Elementor’s Header & Footer plugin came as a breath of fresh air to us. Control over your headers and footers were previously limited, but with this feature, you can mould them to your exact liking.
While the plugin lets you do a lot, some features are a little harder to set up. Namely, making your headers transparent or making them change color while scrolling can get a bit tricky.
If you’ve had problems creating these visuals for your pages, this article is just what you need. This will be a step-by-step manual on how to pull off these features.
Note: this advice will also work on mobile!
-
How to Make Headers Transparent
Headers can be made transparent in just a couple of easy steps. So let’s get started!
Step 1: create a header the same way you usually do — don’t forget that it needs to be sticky.
Step 2: don’t choose the background for the part where the header is (setting the rgba to 255,255,255,0 or 0,0,0,0 can also be used to set the background to transparent).
Step 3: publish the header as you normally would.
Step 4: put a negative margin on the page section where the header stands (-100px or less ought to do the trick) so the header can overlap the background.
By now you should have ended up with something similar to the image below.

As you can see, the header is clearly see-through.
However, leaving the header like this may present a problem for someone scrolling down. When the page text and visuals roll under it, it looks messy, and reading like this gets difficult.
So we need to have the header change colors when you scroll. Here’s a quick rundown on how to do this.
-
How to Change Header Color while Scrolling
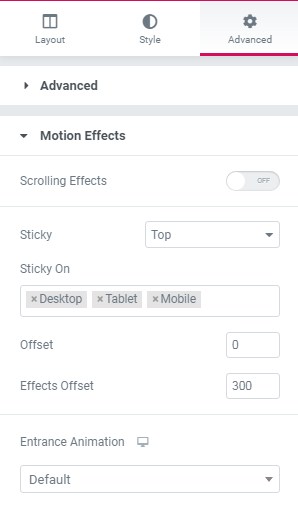
Step 1: Set Effects Offset value to 300 (You can increase/decrease the value as per the preference longer the number, longer you will have to scroll for changing color while scrolling)
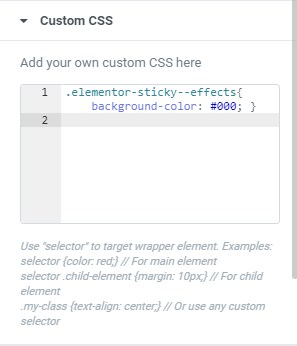
 Step 2: for this one we need to get some CSS work done. Go to the Advanced tab and select Custom CSS. Then type in the following code:
.elementor-sticky--effects{ background-color: #000; }
Doing so makes the sticky header change color as you scroll down a page.
Now, the Advanced tab ought to be filled out like so:
At this point, you have a fully functioning, transparent header with changing colors. But why stop here? While the setup you’ve got now certainly is nice, a little bit more work could give it a much more professional style, and it wouldn’t cost you any load time since 47% of people expect websites to load in 2 seconds or less.
We can still make it look more sleek with the help of some cool effects.
-
Take it a Step Further
This section will be dedicated to adding the following features:
Reduce header height when scrolling down so everything behind it is easy to see;
Make said size change snap-free for a nicer look.
Size Changing Header
To pull this off, we’ll have to do some CSS customization again. In the Image Advanced tab for the header, add a CSS class or ID and give it a name, something like this:
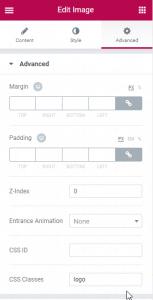
Here the class is called “logo.”
Next, you’ll need to add the following lines of code in the header’s Custom CSS in the Advanced tab (instead of “logo” just use whatever name you gave to the class mentioned a moment ago):
This sets the limits for the size changes.
.elementor-sticky--effects .logo img {

width: 50% !important;

}
You can tweak these given values to what suits you. After this, your header should change size according to where you are on a page.
Smooth Header Size Change
Finally, we can give the header a satisfying animation as it changes sizes. Here’s how we do that.
This sets the transition rate (this sets the rate to 0.5 seconds, but see which value works best for you).
.elementor-sticky--effects{
background-color: #000 !important;
    transition: background-color 0.5s ease !important
}
.elementor-sticky--effects .logo img {

width: 50% !important;
transition: width 0.5s ease !important
}
This removes the snap.
Finally, we’ve created a smooth-looking, transparent header that changes color when not on the top of the page.
If you are not tech-savvy and looking to get some tech help for your website, contact us for Affordable Web Development Services


8 thoughts on “Elementor Guide on How to Make Headers Transparent”
Hi,
really nice job, thanks.
I have something to add:
when scrolling back up the transition is not working.
I have added transition for that also.
And also added css for the transparent header to be fix without negative margin.
selector {
position: absolute;
width: 100%;
transition: background-color 1.5s ease !important;
}
.elementor-sticky–effects {
background-color: #CBCBCBEB;
transition: background-color 1.5s ease !important;
}
.elementor-sticky–effects .logo img {
width: 50% !important;
transition: width 2s ease !important;
}
.logo img {
transition: width 2s ease !important;
}
Thanks for contributing to our post
I have a two-section header; top section with logo and phone number, bottom with nav menu. When creating a transparent header everything looks perfect, in each of the views (desktop, tablet, mobile).
However, when working on a page everything works terrifically until I preview in mobile. At that point the hamburger covers the the logo on the header; the phone number is set to not show on mobile view.
At this point I am working in WP Staging Pro. I have not yet pushed the site live. Am worried to do so until this issue is resolved. Any ideas on a work around? Thanks!!!!
BTW, I am using Elementor Pro
Can you share the link so we can review and suggest any improvement which you might need?
How can this be done without making the header sticky?
In Step 1 screenshot is showing “Desktop” “Mobile” “Tablet” you can remove these to disable sticky header https://i.imgur.com/7w7IF4q.png
Great article